Best Concrete Flooring Repair Company in Mountain View, CA
Handyman Services of Mountain View
Looking for Concrete Flooring Repair Service near Mountain View, CA? Handyman Services of Mountain View is the premier Concrete Flooring Repair Service in the Mountain View, CA.Our extensive range of concrete floor repair mortars and screeds can eliminate all problems associated with poor and damaged trafficable surfaces. By reducing the likelihood of accidents to pedestrians and damage to vehicles, costs and claims can be minimised.Best Concrete Flooring Repair Service in Mountain View, CA. Cost? Free estimates! Call now or Send a quick message for an estimate.
CONCRETE FLOORING REPAIR SERVICE IN MOUNTAIN VIEW, CA
The professional Concrete Flooring Repair will At Handyman Services of Mountain View, our experienced flooring experts can provide the best Concrete Flooring Repair in Mountain View, CA at a very reasonable price. We take pride in offering the best Concrete Flooring Repair.Our Handyman Services of Mountain View experts take pride in providing the best service in the Mountain View, CA area.
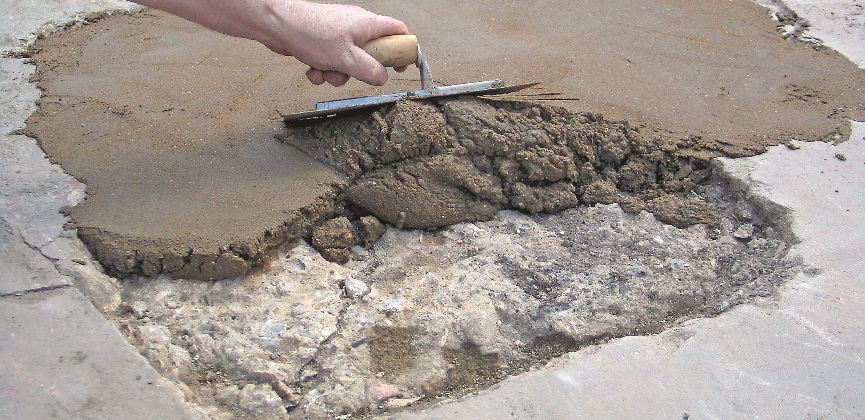
How to Repair a Concrete Floor
In spite of the concrete finisher’s best efforts, sometimes the finished product has significant imperfections. Even a carpet laid on a pad or vinyl flooring cannot be expected to cover up every flaw, so repairing a slab is the builder or homeowner’s best choice for correcting the problem. Before patching, make sure your concrete is structurally sound. Much like medicine, it is better to treat the cause than just address a symptom. Sometimes surface defects are a clue that there is a bigger problem at hand. Have a professional assess whether patching is the right solution at Mountain View, CA.
1.Determine the scope of the problem. The illustrations in this article show a repair where a slab reinforcing bar was too near the surface, and the concrete cracked. Other possible problems may include the following.
- Ridges or humps left by the finishers.
- Expansion or contraction cracks. Properly installed concrete should have joints that prevent this unsightly cracking. improperly placed, cracks can occur. Typically these cracks are not structural and only need to be repaired for aesthetic purposes.
- Debris like chunks of wood floating out of the concrete while it is still plastic (wet).
- Damage caused by heavy objects being dropped on the slab before it is cured.
- Surface scaling caused by improper finishing or freezing temperatures during curing. Scaling is when parts of the concrete surface flake away.
2.Use a ruler to determine the length and width of the area to be repaired if the condition does not define itself. This may include bumps, depressions, or ridges. Small areas of shallow surface irregularities may be concealed with a floor leveling compound, rather than chipping out and replacing the actual concrete.
3.Chip the surface of the concrete to remove any high material, and to create a rough surface for the repair cement mixture to bond to.For small jobs, a chipping hammer will be all you need, but larger repairs are much easier with an electric chipping hammer or even a jack hammer. Professionals also use grinding machines to prep the surface for repairs.
4.Clean the dust and debris from the area you have chipped.This will allow the new material to have a solid surface to adhere to. A wire brush is a good choice for this step. A stiff bristled broom or paintbrush will also work. Depending on the age and condition of the concrete chemical cleaning may be required, it is best to consult a pro.
5.Mix the cement/sand material you will use to fill in the area you have chipped out. Mix the dry ingredients first, using a proportion of 1 part Portland Cement (type I or II) to 2 1/2 parts clean masonry sand.
6.Add a latex or polymerized liquid bonding agent to the dry sand/cement mixture, using enough to thoroughly wet the material and bring it to a stiff, plastic consistency. Note that some bonding agents are applied directly to the area to be patched, like glue, so follow the instructions on the manufacturer’s label.
7.Wet the area where the patch is to be applied with clean, fresh water. Do not flood the area, but make sure all surfaces are dampened, to assist in adhering the new cement mixture, as well as keeping the mixture from drying too quickly. Dry surfaces simply draw the moisture from the cement mixture too quickly, and will cause it to shrink, and ultimately, to crack.
8.Scoop some of your cement mixture out of your mixing container with a bull-nosed pointing trowel (or other suitable tool). Place the mixture into, or on the patch location, and work it into the space forcefully with the trowel to force out any air bubbles.
9.Level the surface of the wet cement with the trowel, leaving it slightly higher than the adjacent edges, to allow for settling and shrinkage. Allow it to dry and become stiff for an hour or so, depending on humidity and temperature.
10.Trowel the area with a steel finishing trowel when the patch material has become stiff. This will flatten and smooth the surface, and cause cement paste to rise to the surface. Very large, deep areas may be floated with a magnesium float to bring more cement paste up. This paste is the material that forms the surface of the finished slab.
11.Give the area another hour or two so that it sets up, or becomes hard, then finish trowelling it. At this point, you may need to splash a little water on the surface to slow the drying, as well as making the finishing process somewhat easier. Use the edge of your trowel to shave, or scrape off any of your cement mixture which has spread to the adjacent, finished surface. Another good choice for patching materials are hydraulic cements. They usually set up in less than 30 min.Handyman Services of Mountain View provide these service with affordable prices.
12.Clean your tools, and remove any excess material.
Need an estimate? Want to offer feedback? Have a question? You’ve come to the right place. You can reach us by phone or use this form to send us the details. Either way, we look forward to hearing from you.
Call us for :
- Concrete Floor Repair Screed
- Concrete Floor Repair Products
- Patching Concrete Floor Holes
- How To Fix Crumbling Concrete Basement Floor
- How To Fix Concrete Floor Uneven
- Filling Small Holes In Concrete Floor
- Concrete Floor Crack Repair
- Concrete Floor Patch Fill
Service area
- Mountain View, CA Concrete Flooring Repair Service near me
- Los Altos, CA Concrete Flooring Repair Service near me
- Sunnyvale, CA Concrete Flooring Repair Service near me
- Los Altos Hills, CA Concrete Flooring Repair Service near me
- Palo Alto, CA Concrete Flooring Repair Service near me
- Cupertino, CA Concrete Flooring Repair Service near me
- Stanford, CA Concrete Flooring Repair Service near me
- East Palo Alto, CA Concrete Flooring Repair Service near me
- Menlo Park, CA Concrete Flooring Repair Service near me
- Santa Clara, CA Concrete Flooring Repair Service near me
- Saratoga, CA Concrete Flooring Repair Service near me
- Campbell, CA Concrete Flooring Repair Service near me
- Milpitas, CA Concrete Flooring Repair Service near me
- Newark, CA Concrete Flooring Repair Service near me
- Redwood City, CA Concrete Flooring Repair Service near me
- San Jose, CA Concrete Flooring Repair Service near me